When customers buy things through your WooCommerce shop, they can sign up to your website right there in the checkout. But if you want to control the signup process, a better option can be Gravity Forms.
Building a custom form allows you to guide your new members through the signup process and get them to fill in the information that you need, including some things that they don’t enter at the checkout.
The plugins
Gravity Forms has some useful add-ons that help you build signup forms. You’ll need the Elite licence to get the most important one — User Registrations — so if you have a lower licence level you’ll need to upgrade to Elite.*
Here are the plugins you will need for your signup form:
- WooCommerce
- Gravity Forms (Elite licence)
- Gravity Forms User Registration add-on
* If you bought a Gravity Forms Developer licence before they restructured their licence levels, you already have access to all of the Elite add-ons.
Also recommended:
- Gravity Forms Mailchimp or Campaign Monitor add-on, for mailing list integration
- GF Address Enhanced, if you want to use Address fields
Address complications
If you want your form to record the new member’s address, there’s a complication. WooCommerce, rather sensibly, records both the billing country and shipping country by their ISO standard code. Gravity Forms, however, records the country by name. I wrote about that in Gravity Forms and WooCommerce country codes, which includes some code to help you deal with that in simplistic circumstances.
But it’s a little more complicated than that, because WooCommerce also records values for the state or province in some countries by a code (and not always the ISO code). User Activation can complicate matters further, if you try to use a custom drop-down for your state / province field.
That’s where the GF Address Enhanced plugin comes in. It provides a drop-down list of states or provinces in countries that support them, or a text field in countries that don’t. It can use the country code for User Registration feeds, and the country name for the Gravity Forms entry data and notifications. And it handles User Activation properly.
It can also work the other way around too, if you want to use Gravity Forms as a customer profile editor.
Building the form
Create a new form and give it a meaningful title, like “Member signup”. You can give it a description if you like; I tend to use the form description for comments about how the form is used, and don’t show the description on the front end.
There’s a form setting called “Anti-spam honeypot”, which you should turn on. It will help stop some simple spam scripts, but I recommend also adding a Recaptcha field to the form.

Form fields
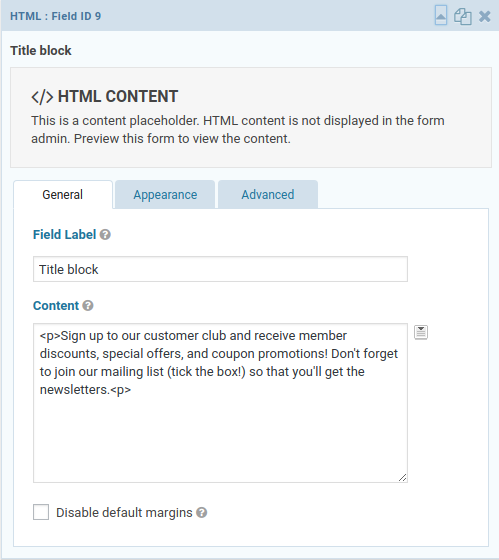
I usually start a form with an HTML field, with some general instructions for the new member. I use an HTML field in the form, instead of on-page text, because it will only be shown on the form itself and won’t be shown after the new member submits the form. On a multi-page form, it’s only shown on the first page. Always give your HTML fields a field label, to help you remember what’s in them when you’re editing the form. Especially helpful if you use several HTML fields!
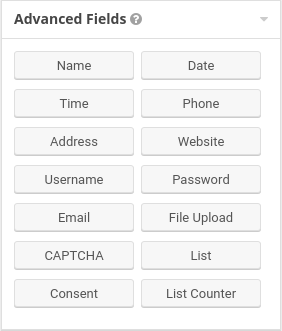
The basic details you’ll want to get from your new members can be met with some purpose-built Gravity Forms fields from the Advanced Fields palette.
- Name — which should be configured for first and last name. You can also accept prefix, middle name, and suffix, but WooCommerce doesn’t accommodate them
- Login name — the User Registration add-on adds a Username field for this purpose
- Email address — you can choose to make this show a confirmation field, but I never do
All of these fields need to be marked as required fields. A new member cannot be signed up without this information.
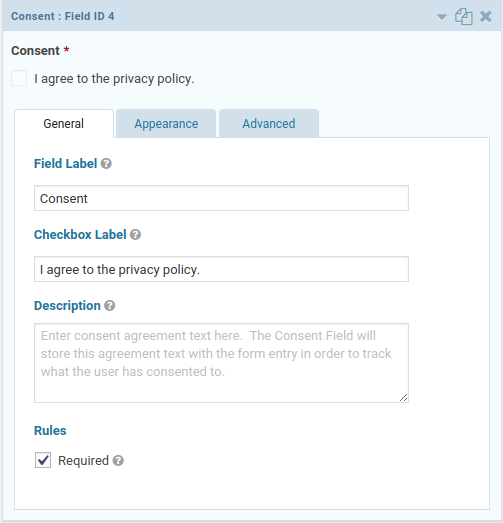
Many jurisdictions now require you to get and record consent from customers before storing any of their personal information. I recommend that you add the new Gravity Forms Consent field, which is made especially for this purpose.
To help cut down on spam signups, I recommend also adding a Recaptcha field. Gravity Forms now supports Invisible Recaptcha which is less intrusive for new members, but still blocks a whole lot of scripted spam signups.
In addition to the basic details, you might like to record the new member’s billing and shipping address details. (Remember that there are complications, and you might also need GF Address Enhanced!)
Because the two addresses can be the same for some members, I recommend having a checkbox for “shipping address is different” and only showing the shipping address field if the member ticks that checkbox.
- Billing address — use an Address field
- checkbox: Shipping address is different to billing address
- Shipping address — another Address field, with conditional logic to show when the checkbox is ticked

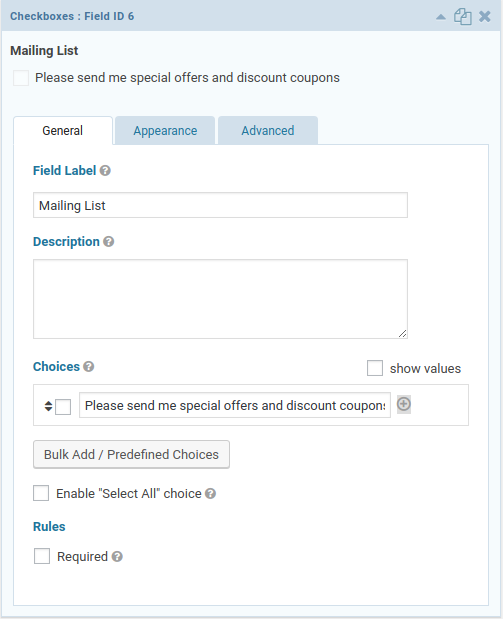
If you want to sign up your new members to your mailing list too, you should add a checkbox asking for their permission. Many jurisdictions now require opt-in for mailing lists, so I recommend that you leave this checkbox field unticked by default.
Save the form before continuing.
Add-on feeds
Once you’ve added all of the fields to the form, you can set up the magic that will create a new WordPress user, and optionally sign them up to your newsletter.
User registration
Before you begin, make sure that the User Registration add-on can find the WooCommerce customer field names. With WooCommerce enabled, edit an existing WordPress user and click Update User; WooCommerce will add the necessary fields, even when they’re empty.
You can now create a User Registration feed for your form. Edit your member signup form and navigate through its menu to the User Registration page:
Settings > User Registration
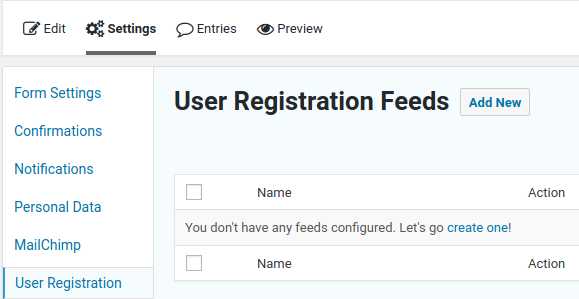
From there you can create a new feed, which will instruct Gravity Forms in how to create a new WordPress user for your new member. Give the feed a name (something meaningful, please!) and click the Create User button. More fields will be revealed on the feed.

Map fields in the form to the basic WordPress user fields under the User Settings heading. You also need to pick a WordPress user role for your new member; this should be Customer unless you have special member roles (e.g. for a discount club).
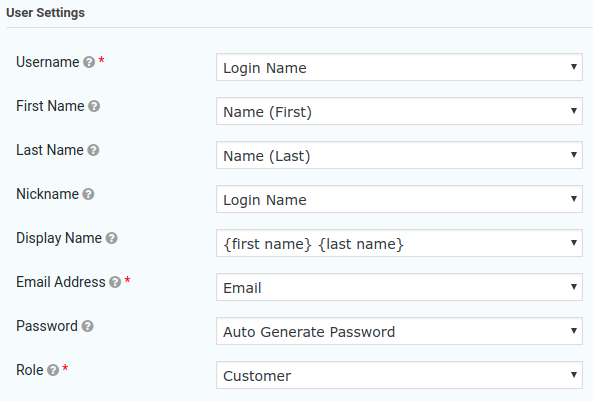
Now for the WooCommerce-specific part: mapping WooCommerce customer fields (left) to fields in the form (right). You can map the email address and name parts to their WooCommerce equivalents. These are used in the billing contact part of the checkout, and it’s nicer for the new member if you’ve prefilled that for them. In WooCommerce, they are called:
- billing_email
- billing_first_name
- billing_last_name
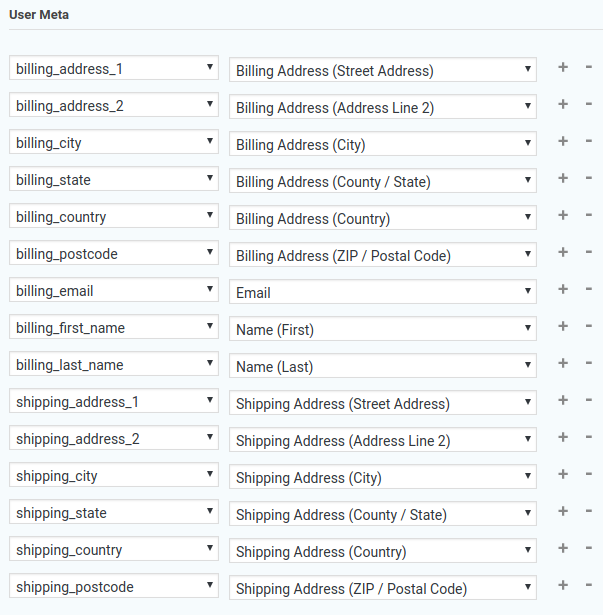
If you’ve added the billing and shipping address to your signup form, map them to the following WooCommerce customer fields:
- billing_address_1
- billing_address_2
- billing_city
- billing_state
- billing_postcode
- billing_country
- shipping_address_1
- shipping_address_2
- shipping_city
- shipping_state
- shipping_postcode
- shipping_country
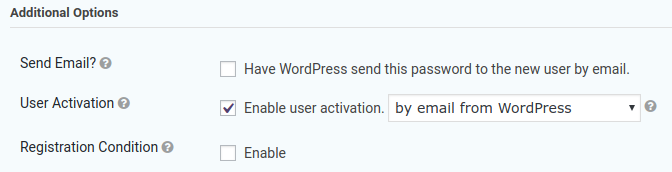
Finally, it’s a good idea to enable User Activation. This ensures that the new member must be using a valid email address, and suggests that there’s a real human at the end of it. Gravity Forms will send an email to the new member with an activation link, and won’t create the WordPress user without that link being clicked.
Save the feed before continuing.
Mailchimp / Campaign Monitor
If you want to sign up new members to your mailing list in Mailchimp or Campaign Monitor, you’ll need to add a feed for that too. We’ll look at doing it with Mailchimp, but the process for Campaign Monitor is pretty similar.
Before you begin, the Mailchimp add-on must have a valid API key for talking to your mailing list. If you haven’t done so already, you’ll need to create a Mailchimp API key for Gravity Forms and add the API key to your Mailchimp add-on settings.
You can now create a Mailchimp feed for your form. Edit your member signup form and navigate through its menu to the Mailchimp page:
Settings > Mailchimp
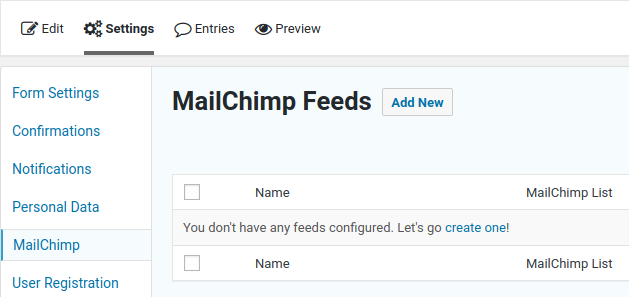
From there you can create a new feed, which will instruct Gravity Forms in how to sign up a new WordPress user to your mailing list. Give the feed a name (something meaningful, please!) and select the mailing list you wish to use. You can now map the available fields in your form to the Mailchimp fields.
Tip: make sure that Double Opt-in is ticked, so that your new member confirms that they have signed up to the mailing list. Better than having them report it as spam when it arrives for the first time!
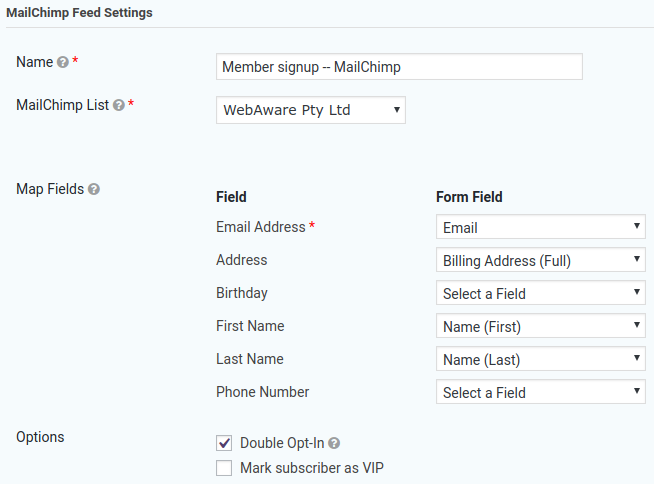
Because we’ve added a checkbox to our form allowing the new member to opt in during signup, you will also need to make your new Mailchimp feed conditional on the opt-in field in your form. At the bottom of the feed, tick Enable Condition and select the checkbox field and its value. The feed will now only add the new member to the mailing list if they’ve opted in.

Save the feed before continuing.
Confirmation message
The confirmation message needs to let the new member know what to expect next. Gravity Forms will send them an activation link, which they’ll need to click before they can become an active member, so tell them that.

Save the confirmation message before continuing.
Notifications
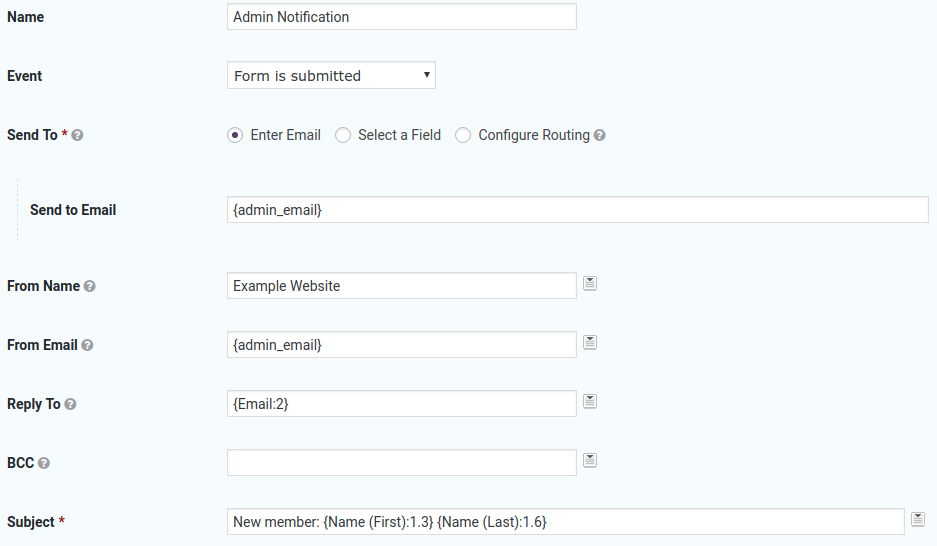
The default notification for any form is an admin notification. This is sent to you, the website administrator, and by default it’s pretty generic. We can make it a little more helpful with some simple changes. The subject should be informative, and replying to the email should send a reply to the new member.
Edit the Admin Notification and change the following items:
- From Name: this should be your website name, essentially to help prevent the email being blocked by spam filters
- Reply To: pick the email field from the form, using the picker at the end of the field
- Subject: change it to “New Member: ” and then add the first and last name fields using the picker at the end of the field
Save the notification before continuing.
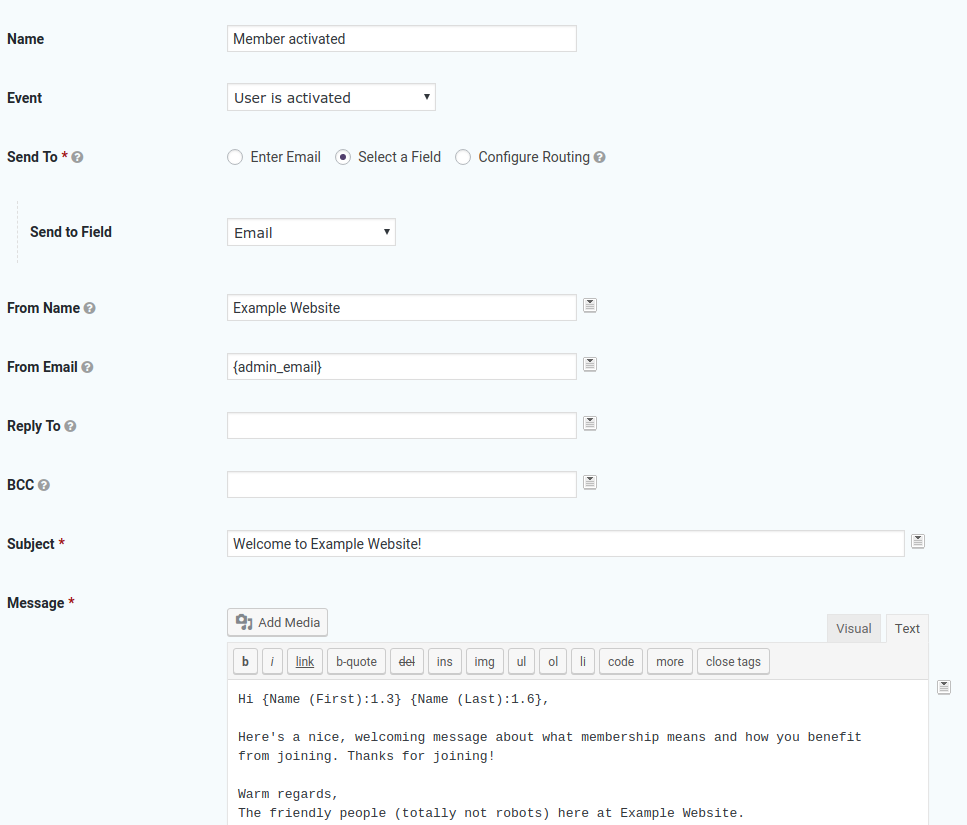
Once the new member has activated their new WordPress account, it would be nice to automatically send them a welcome message with any information they might need. You can do this by adding a new notification. Call the notification “Member activated” or similar. Make the following changes to the notification:
- Event: pick “User is activated”
- Send To: “Select a Field”
- Send To Field: pick the email field using the picker
- From Name: your website name
- Subject: a nice welcome message title
- Message: compose a nice welcome message with useful information
You can personalise the welcome message with the new member’s name by adding fields from the form, using the picker next to the Message field.
Save the notification before continuing.
Ready to go
Now that you’re ready to go, give it some testing. Actually sign up to your website using the form. You’ll need a secondary email address to do that with, but you can use a throw-away one just for testing.
Once you’ve confirmed it all works well, hook it in to your website menus and go get some customers!